Friday, December 30, 2011

Bulkheads: (continued)

Took a few day holiday after Christmas to visit my parents and check out the Saturn Hans is building in Punta Gorda. Hans is quite an experienced multi-hull builder and seem quite impressed with the Vardo drawings I showed him.

The weather is quite good for the next few days and I'm hoping to get the rest of the starboard hull bulkheads done this weekend.


In the foreground is bulkhead #3.5 and in the background #5. Note the areas not coated in #5 will be the cutout into the berth. #3.5 is notched to accept the bridgedeck on the inboard side and will later have the mast beam jointed up to it.

WARNING: "photos of sistership"


Actually these are a few pics of a Woods Saturn under construction in Punta Gorda, FL. About one year into build and being very nicely built. My boat is basically the same hull wise just about 25% bigger.

Sunday, December 25, 2011

HoHoHo


THANKS SANTA!!!

Perspective

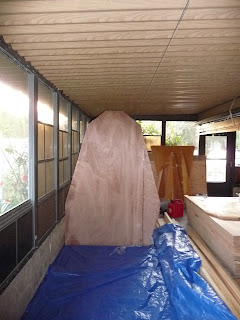
I should have spent Friday on a customer's boat, but the weather was so nice I decided to do a bit more bulkhead work. These bigger bulkheads are around 5' wide and the sheets of ply 4' so some creativity is required to maximize the bulkhead size and minimize the waste of ply. I've decided to continue on with just the bulkheads for the starboard hull as the layout is a bit different especially in my boat that will have a full length berth forward of the galley and provision for a temporary visitor berth forward of the head on the port side.

This is bulkhead #5 which will have a cutout for access for the aft bunk. I've decided to build the starboard bunk the standard width as this will be John or Lily's cabin, but may raise the berth height a bit on the port hull for our berth. This will also change the height of bulkhead #6 so I feel it best to wait to see how this berth seems size wise before making any further decisions. I did get the framing cut for the port hull while I had the table saw setup and this will also help track the amount of timber I need to get to complete the hulls. The aft side of this bulkhead is completely framed.

I fired off a few frantic emails to Richard regarding the overall height of the bulkhead when in building phase. He assure me nothing would be over 8' As you can see, I have around a foot clearance to the roof. This should allow enough room to work and fit the bottom panels and hopefully get it glassed, perhaps prior to fitting the bilge panels. Also note the inner edge of this bulkhead is left square above the sheer as this part will join with additional sheets to create the aft end of the bridge deck cabin.

Wednesday, December 21, 2011

Getting Going

I bought this giant roll of fiberglass a few weeks back. It's 72" wide and weighted somewhere between 200 to 300 lbs. One reason it was such a good deal is the store couldn't really handle it. It took 3 guys to get it into the car and our neighbor happened to have a appliance truck. It was all Abby and I could do to get it out of the car and into the patio. I ended up taking the hear axle off the spar trailer and built this stand. The axle is a bit loose in the tube, but it rolls OK.

On Tuesday, I cut a bunch of material for framing the bulkheads. The cutting of the pieces went pretty fast, but took most of the afternoon to get them all glued and nailed to the bulkheads.


The hope in building at home is to make it something of a family project. Here John is practicing his woodworking.

Monday, December 19, 2011

The first cut!


I've decided to make all the bulkheads in one go, I may do this with the hull planking as well. My thinking on this is it will take some of the agony out of having to build the additional hull. A lot depends on weather in Jan and Feb as my indoor build space is unheated, but I can heat the garage and glass a few panels in there at a time. I'm hoping to have made some size-able headway prior to my 6 week trip to New Zealand in March. It will be plenty warm for glass work when I return.


Richard is still working on the final bulkhead details and it's been cool the last few night so may be slowed down a bit. Hope to have all the bulkheads cutout during the holidays.

Saturday, December 17, 2011

MISC DIY

Not so much a boat building post, more of a what I do on a regular basis/ more about me post. As I plan (mostly short-handed) to build the boat, turn the hulls, load to my trailer, launch at the local ramp, and build a temporary mast tabernacle to step the mast, I figured a taste of my credentials might be in order. Oh, I also have a degree in Economics.


Fridays seem to be my "haul weird stuff" day. Last Friday I got the mast, this Friday I unloaded this engine with my tree "crane", got some wood in Jacksonville, unloaded the wood, reloaded the engine and then loaded the engine onto a truck at the Flying J south of town on I-95.
Next Friday???

Got Wood?

A large load of wood arrived Thursday and I purchased a further 13 sheets on Friday. Guess than was a bit risky a combo?

I'm using Okoume 1088 for the hull planking, some bulkheads and decks, but AB Marine Fir for bulkheads that will be glassed both sides and some AC fir for the hull bottoms as it is doubled 3/4". Managed to find locally some really nice 7 ply 3/4" fir which may end up being one of the best values in the whole boat. Will likely work a bit of Meranti in for the bilge planks as well. I think 9mm Okoume is spec'd for that, but I may use 12mm Meranti in that area as I'm planning to sail this boat many, many offshore miles. Some of the non critical interior pieces will hope fully make use of some nice birch UlraPly XL.

Need to go to Gainesville for another load of cypress timber soon as well....


Here we are trying to fit bulkhead #2, #1 and 1/2 of the inner transom onto a sheet of 3/8" ply. As I was eager to get started, Richard agreed to get me the plans a bit before they were ready for prime time. I've got to work out my own ply layouts and wrap my head around working on metric. My sole metric tape is a bit worn so need to replace that soon. Some US Woods builders have mentioned "having" to convert to imperial, but I figure "When in Rome" use metric or something like that.


Yes, I used our poor car to tow the wood up out of the street. On the subject of poor; this load of wood cost twice what the car did!


I ordered a large amount of the plywood needed from Noah's in Canada and it took a bit of time to arrive. It ended up coming a few days ahead of schedule with the truck showing up at 5pm Thursday. The problem was getting 1400 pounds of wood down a too small lift gate and then into the street, then into the driveway, then into the patio/ boatshed!

Saturday, December 10, 2011

Stringers

There's a lot be said for building a design with no stringers! Over about a day or so this past week I ripped around 1000 feet of stringer material from 2 by 8 stock. Then I had to cut 8:1 scarfs in each piece as the wood was just 16' long, but the longest stringers need to be around 36' The downside to not having stringers is a lot more complex materials are needed (foam, cold molding, cedar strip) or you have to use really heavy ply. I've seen interior pics of the Aussie Easy Catamarans (ply hulls) with no stringers in sight, must use heavy ply or have weak topsides.

On the plus side it it helps hold all the bulkheads together when adding the Okoume plywood planking. I think it represents the best way for a limited production multi-hull to be built strong but light and for a reasonable cost and time expenditure.

Again from the Searunner Manual, I made up this jig for an 8:1 scarf on my table saw. I got this industrial size DeWalt saw second-hand a few months ago, the table is cast iron so rusts a bit in our location. I try to oil it every few weeks and it's been an excellent tool so far.


Here is a scarf joint being glued. They didn't all look quite this good, but I was very happy with the results. In 25 years of repairing and building boats, these were the first scarf joints of this type I had ever made.


This last picture is 11 finished full length stringers hanging form the patio ceiling. This ceiling/ roof is metal slats which I plan to take apart to build the cabins and bridgedeck. I may end up doing this in the driveway instead, depends on what time of year it ends of being and how much I can do without removing the roof.

Setting Up Building Area

I'm planning to build in my enclosed patio. The area is roughly 35' by 20'. The Woods Vardo is 34' long and will be just under 20' wide. This area where John is standing is actually 38' long so will hopefully be able to get out the door to hang the laundry when one hull is being built. May move one hull outside after the first is done then back in to assemble bridgedeck.


Jeff, another Woods builder in MN recommended foregoing a wood strongback and attached cleats directly to the concrete floor. I strung a line down the floor and spray painted to get a centerline every 4'. The floor is pretty level with one noticeable high spot so I may need a laser level to help get the bulkheads setup.


I also hung an overhead line as recommended by Jim Brown in Searunner Construction Manual. You can see it all lines up pretty well so far. This overhead line and plumb bob will assist in getting bulkheads setup square to the floor.

A Mast

Bought a mast from Tom Holland in Green Cove Springs. He has a bunch of pulpits and other bits that maybe of use later on.